1. Swagger的产生
我们的RESTful API需要面对多个开发人员或多个开发团队:IOS开发、Android开发或是Web开发等。为了减少与其他团队平时开发期间的频繁沟通成本,传统做法我们会创建一份RESTful API文档来记录所有接口细节,然而这样的做法有以下几个问题:
由于接口众多,并且细节复杂(需要考虑不同的HTTP请求类型、HTTP头部信息、HTTP请求内容等),高质量地创建这份文档本身就是件非常吃力的事,下游的抱怨声不绝于耳。
随着时间推移,不断修改接口实现的时候都必须同步修改接口文档,而文档与代码又处于两个不同的媒介,除非有严格的管理机制,不然很容易导致不一致现象。
Swagger的产生就是为了解决以上这些问题。
2. Swagger的介绍
Swagger 是一个规范和完整的框架,用于生成、描述、调用和可视化 RESTful 风格的 Web 服务。总体目标是使客户端和文件系统作为服务器以同样的速度来更新。文件的方法,参数和模型紧密集成到服务器端的代码,允许API来始终保持同步。Swagger 让部署管理和使用功能强大的API从未如此简单。
接下来我们介绍spring boot怎么集成swagger。
3. 新建maven java project
新建一个maven java project取名为:spring-boot-Swagger
4. 在pom.xml添加依赖
主要是springfox-swagger2和springfox-swagger-ui,版本号根据
1 | <!-- Swagger --> |
5. 创建Swagger2配置类
编写一个swagger配置类,com.config.SwaggerConfig:1
2
3
4
5
6
7
8
9
10
11
12
13
14
15
16
17
18
19
20
21
22
23
24
25
26
27
28
29
30
31
32
33
34
35
36
37
38
39
40
41
42
43
44
45
46
47
48
49
50
51
52
53
54
55
56
57
58
59
60
61
62
63
64
65
66
67
68
69
70
71
72
73
74
75
76
77
78
79
80
81
82
83
84
85
86
87
88
89
90
91
92
93
94package com.config;
import org.springframework.context.annotation.Bean;
import org.springframework.context.annotation.Configuration;
import org.springframework.web.context.request.async.DeferredResult;
import com.google.common.base.Predicates;
import springfox.documentation.builders.PathSelectors;
import springfox.documentation.service.ApiInfo;
import springfox.documentation.spi.DocumentationType;
import springfox.documentation.spring.web.plugins.Docket;
import springfox.documentation.swagger2.annotations.EnableSwagger2;
/**
* Swagger配置类:
* @author Angel --守护天使
* @version v.0.1
* @date 2016年9月7日
*/
@Configuration
@EnableSwagger2
public class SwaggerConfig {
/**
* SpringBoot默认已经将classpath:/META-INF/resources/和classpath:/META-INF/resources/webjars/映射
* 所以该方法不需要重写,如果在SpringMVC中,可能需要重写定义(我没有尝试)
* 重写该方法需要 extends WebMvcConfigurerAdapter
*
*/
// @Override
// public void addResourceHandlers(ResourceHandlerRegistry registry) {
// registry.addResourceHandler("swagger-ui.html")
// .addResourceLocations("classpath:/META-INF/resources/");
//
// registry.addResourceHandler("/webjars/**")
// .addResourceLocations("classpath:/META-INF/resources/webjars/");
// }
/**
* 可以定义多个组,比如本类中定义把test和demo区分开了
* (访问页面就可以看到效果了)
*
*/
@SuppressWarnings("unchecked")
@Bean
public Docket testApi(){
Docket docket = new Docket(DocumentationType.SWAGGER_2)
.groupName("test")
.genericModelSubstitutes(DeferredResult.class)
.useDefaultResponseMessages(false)
.forCodeGeneration(true)
.pathMapping("/")// base,最终调用接口后会和paths拼接在一起
.select()
.paths(Predicates.or(PathSelectors.regex("/api/.*")))//过滤的接口
.build()
.apiInfo(testApiInfo());
return docket;
}
@SuppressWarnings("unchecked")
@Bean
public Docket demoApi() {
return new Docket(DocumentationType.SWAGGER_2)
.groupName("demo")
.genericModelSubstitutes(DeferredResult.class)
// .genericModelSubstitutes(ResponseEntity.class)
.useDefaultResponseMessages(false)
.forCodeGeneration(false)
.pathMapping("/")
.select()
.paths(Predicates.or(PathSelectors.regex("/demo/.*")))//过滤的接口
.build()
.apiInfo(demoApiInfo());
}
private ApiInfo testApiInfo() {
ApiInfo apiInfo = new ApiInfo("Test相关接口",//大标题
"Test相关接口,主要用于测试.",//小标题
"1.0",//版本
"https://griabcrh.github.io/",
"griabcrh",//作者
"griabcrh的博客",//链接显示文字
"https://griabcrh.github.io/"//网站链接
);
return apiInfo;
}
private ApiInfo demoApiInfo() {
ApiInfo apiInfo = new ApiInfo("Demo相关接口",//大标题
"Demo相关接口,获取个数,获取列表,注意:",//小标题
"1.0",//版本
"https://griabcrh.github.io/",
"griabcrh",//作者
"griabcrh的博客",//链接显示文字
"https://griabcrh.github.io/"//网站链接
);
return apiInfo;
}
}
上代码所示,通过@Configuration注解,让Spring来加载该类配置。再通过@EnableSwagger2注解来启用Swagger2。
再通过createRestApi函数创建Docket的Bean之后,apiInfo()用来创建该Api的基本信息(这些基本信息会展现在文档页面中)。select()函数返回一个ApiSelectorBuilder实例用来控制哪些接口暴露给Swagger来展现
经过这2步配置后,我们启动服务后,访问:http://localhost:8080/swagger-ui.html 就完成了集成。
下面编写2个controller进行测试;
6.编写controller测试类
1 | package com.controller; |
1 | package com.controller; |
1 | package com.bean; |
Swagger2默认将所有的Controller中的RequestMapping方法都会暴露,然而在实际开发中,我们并不一定需要把所有API都提现在文档中查看,这种情况下,使用注解@ApiIgnore来解决,如果应用在Controller范围上,则当前Controller中的所有方法都会被忽略,如果应用在方法上,则对应用的方法忽略暴露API。
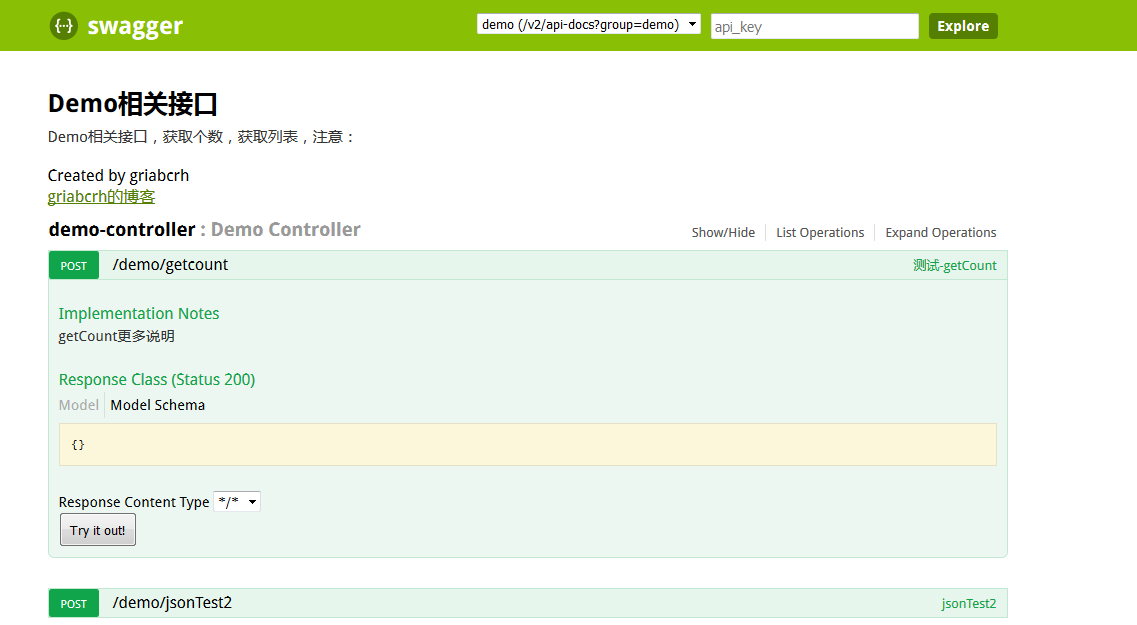
在访问http://localhost:8080/swagger-ui.html就可以看到如下效果:
